
Are you looking for protein-rich veggie lunches that your kids will enjoy? In this guide, you’ll learn how to combine fresh, colorful vegetables like carrots and cucumbers with plant-based proteins such as chickpeas, black beans, and tofu to create tasty and nutritious meals. Try cutting your ingredients into fun shapes using cookie cutters and serving them in compartmentalized bento boxes for an eye-catching presentation. When kids join meal planning and prep, they are more likely to eat what they helped make. Healthy fats like avocado or nuts and kid-friendly seasonings create balanced lunches that keep energy levels high. Read on for easy, step-by-step recipes and practical prep tips to make your school lunches a daily hit.
In this Article
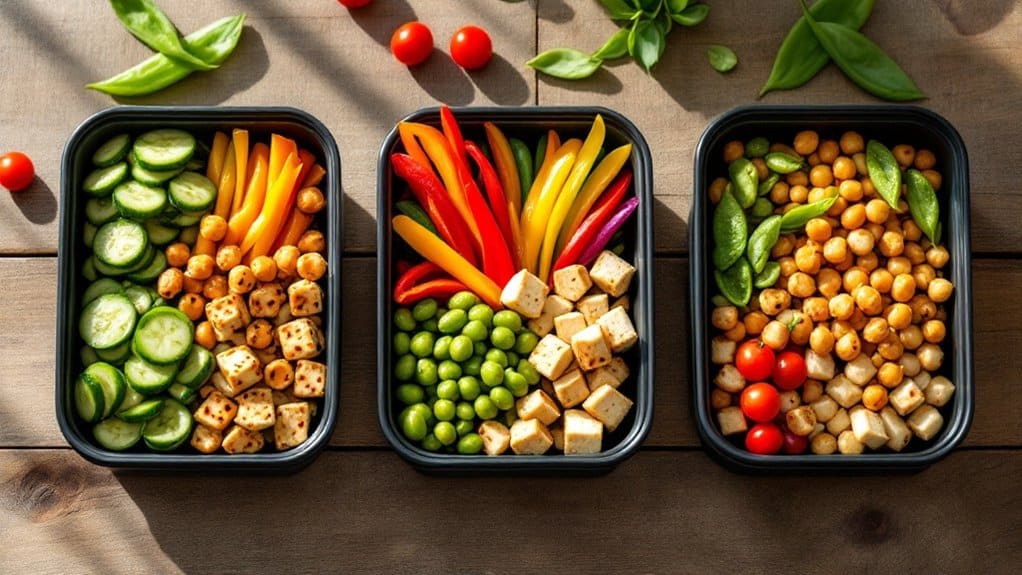
Lunchbox Recipes for Kids: Veggie Bento Boxes with a Twist
This recipe turns everyday ingredients into a playful, nutritious lunch, perfect for bento-style lunch boxes. It’s designed to be visually appealing and easy to assemble—even on busy mornings. Packing lunches in bento-style lunch boxes can make the process more organized and enjoyable for parents and kids.
Why Kids Need Protein
When your child doesn’t get enough protein, you might notice they tire more easily or have trouble focusing. That’s why balanced, protein-rich lunches are so crucial for their daily success.
Introduction to Veggie Bento Boxes
Veggie bento boxes are a fantastic way to get kids excited about eating their vegetables and fruits. Originating from Japan, a bento box is a well-balanced lunch box that typically includes a mix of carbs, protein, and vegetables. By incorporating a variety of colorful veggies and fruits, you can create a visually appealing and nutritious meal that kids will love. These bento boxes make lunchtime fun and help children develop healthy eating habits. A bento box is an excellent choice for a packed lunch, ensuring that each component stays fresh and flavorful until it’s time to eat. In this section, we’ll explore some creative and easy-to-make veggie bento box ideas that will make your kids look forward to their lunch every day.

What is a Bento Box?
A bento box originating from Japan is a delightful and practical way to pack school lunches. These compartmentalized containers are designed to hold a balanced meal, typically including a mix of protein, vegetables, fruits, and whole grains. The beauty of a bento box lies in its ability to keep different food items separate, ensuring that each component stays fresh and flavorful until lunchtime. This makes bento boxes an excellent choice for school lunches, as they are visually appealing and encourage a well-rounded diet. With their neat compartments, bento boxes make it easy to pack a variety of foods, turning an ordinary lunch into a fun and nutritious experience for kids.
Benefits of Using a Bento Box for School Lunches
Using a bento box for school lunches offers many benefits beyond just packing a meal. Firstly, bento boxes promote balanced nutrition by allowing you to include a variety of food groups in one meal. This is crucial for a child’s growth and development, ensuring they get the necessary nutrients. Secondly, the design of bento boxes makes them easy to eat, reducing the risk of spills and messes, which is a common concern with traditional lunch containers. Additionally, bento boxes help minimize food waste by letting you pack small portions of different foods rather than a single large serving that might go uneaten. Lastly, the creative aspect of packing a bento box can make lunchtime more exciting for kids. Parents can get inventive with ingredients and presentation, making healthy foods more appealing and fun to eat.
Ingredients for School Lunches
- Vegetables:
- 1 large carrot, cut into sticks or rounds
- 1 cucumber, sliced into rounds or sticks
- A handful of cherry tomatoes, halved
- Optional: Bell pepper slices for extra color
- Proteins:
- 1 cup canned chickpeas or black beans, rinsed and drained
- ½ block firm tofu cut into bite-sized cubes (you can lightly bake or sauté the tofu with a pinch of salt and pepper if desired)
- Optional: A handful of shredded cheddar cheese for added flavor
- Healthy Fats:
- ½ avocado, sliced
- A sprinkle of chopped nuts (almonds or walnuts) if your child isn’t allergic
- Extras and Dips:
- A small container of hummus or a simple bean dip
- A small container of cottage cheese
- A small container of sour cream for dipping
- Kid-friendly seasonings like a squeeze of lemon juice or a light dusting of nutritional yeast
- Optional: A few slices of cheddar cheese for a tasty addition
- Fun Tools:
- A few cookie cutters (in shapes like stars, hearts, or animals) to create playful designs with tofu or even whole-grain pita slices
Preparation Steps
- Prep the Veggies: Wash and peel (if needed) the vegetables. Cut the carrots into sticks or rounds and slice the cucumber into rounds. Halve the cherry tomatoes and cut the bell pepper (if using) into thin strips.
- Prepare the Protein: Rinse the canned chickpeas or black beans thoroughly. If using tofu, press it lightly to remove excess moisture, then cut into cubes. For added texture, toss the tofu cubes in a small amount of olive oil and a pinch of salt before lightly baking them in the oven for 15 minutes at 375°F (190°C).
- Shape for Fun: Use cookie cutters on tofu cubes or even on slices of whole-grain pita. These shapes can be arranged to form a smiley face or another fun design in the bento box.
- Assemble the Bento Box:
- Fill one compartment with the fresh vegetables.
- In another compartment, place the proteins.
- Arrange the avocado slices and a tiny sprinkle of nuts in a separate section for healthy fats.
- Add a little container of hummus or bean dip on the side as a tasty accompaniment.
- Final Touch: Sprinkle a tiny bit of lemon juice or nutritional yeast over the tofu or vegetables to brighten the flavors before closing the box.
This recipe is flexible—swap in any seasonal veggies or your child’s favorite protein source. The clear compartments in a bento box keep flavors separate, and the fun shapes help keep kids engaged at lunchtime.

Mason Jar Salads
Mason jar salads are a practical and visually appealing way to serve a balanced lunch. As part of various cold lunch ideas, these salads emphasize the ease of packing and the nutritional balance of cold meals. They are layered so the dressing stays at the bottom, keeping the ingredients crisp until it’s time to eat. Packing lunch in mason jars ensures the ingredients stay fresh and crisp until it’s time to eat.
Ingredients (including Cream Cheese)
- Base (Bottom Layer):
- 3–4 tablespoons of a mild dressing (for example, a simple lemon vinaigrette or a kid-friendly honey mustard)
- Hearty Ingredients:
- ½ cup black beans (rinsed and drained)
- ½ cup cooked quinoa or your preferred grain
- Optional: 2–3 tablespoons corn kernels or diced bell peppers
- Fresh Veggies (Middle Layer):
- A mix of chopped vegetables such as diced cucumber, cherry tomato halves, and shredded carrots
- A few baby spinach or lettuce leaves
- Toppings (Top Layer):
- Avocado slices or a small handful of nuts/seeds
- Optional: Crumbled cheese if your child enjoys dairy
Preparation Steps
- Layer the Dressing: Pour your chosen dressing into the bottom of a clean mason jar. This layer ensures that the heavier ingredients absorb flavor without making the salad soggy.
- Add the Hearty Ingredients: Next, add the black beans and cooked quinoa. If using, add corn or diced bell peppers here so that they get a bit of that dressing flavor early on.
- Layer the Fresh Veggies: Top the hearty layer with chopped cucumber, cherry tomatoes, shredded carrots, and a few spinach or lettuce leaves. Arrange the ingredients by color to keep the salad visually appealing.
- Finish with Toppings: Add the avocado slices or a sprinkle of nuts/seeds before serving. If you like, add a little crumbled cheese as a final topping.
- How to Serve: When it’s time for lunch, seal the jar and let your child shake it to mix the dressing with the other ingredients. This creates a well-blended, tasty salad that stays fresh.
This recipe can be customized with your child’s favorite vegetables or proteins. It’s a great option for those who enjoy a mix of textures and colors in their lunch.

Protein-Packed Veggie Wraps
Veggie wraps are versatile, easy to eat, and a great way to combine protein with crisp vegetables. They’re perfect for busy school days when your child needs a portable and tasty lunch.
Protein Filling:
- Ground beef: Cooked and seasoned ground beef can be used as an alternative protein filling for the wraps.
- Cream cheese: Spread a layer of cream cheese on the wrap for added flavor and creaminess.
Ingredients
- Wrap Base:
- Large, sturdy lettuce leaves (romaine or butter lettuce work well) or whole-grain wraps if you prefer something more substantial
- Protein Filling:
- ½ block firm tofu, seasoned (or mashed chickpeas as an alternative)
- A drizzle of olive oil or a tiny splash of soy sauce (if soy is acceptable)
- Vegetable Fillings:
- Shredded carrots
- Cucumber strips
- Sliced bell peppers or avocado slices
- Optional Additions:
- A small dollop of hummus or avocado spread for extra creaminess
- A few fresh spinach leaves
Preparation Steps
- Prepare the Base: If using lettuce leaves, wash and dry them thoroughly. For whole-grain wraps, warm them slightly so they’re pliable.
- Prepare the Protein:
- If using tofu, cut it into thin strips or small cubes. You can lightly season and sauté it in a non-stick pan for 5–7 minutes until it’s warm and has a slight golden edge.
- If using chickpeas, mash them lightly in a bowl and mix in a few seasonings like a splash of olive oil or a pinch of salt.
- Assemble the Wrap:
- Lay the lettuce leaf or wrap it flat on a clean surface.
- Spread a thin layer of hummus or avocado spread on one side.
- Arrange the tofu (or chickpea mash) evenly, then layer on shredded carrots, cucumber strips, and bell pepper slices.
- Top with a few spinach leaves if desired.
- Roll and Secure: Carefully roll the wrap starting from one end. Secure it with a toothpick or wrap it in foil for easier transport if necessary.
- Serving Tip: For extra fun, you can cut the wrap into smaller pinwheel shapes that are easier for little hands to pick up and enjoy.
These wraps are a versatile option, as you can substitute ingredients based on what’s available or what your child prefers. They combine the satisfying crunch of fresh veggies with the softness of a wrap and the heartiness of protein.

Bite-Sized Energy Balls
Energy balls are an excellent snack or side dish that packs a protein punch and provides a quick burst of energy. These little treats are ideal for busy mornings, as an after-school snack, or even as part of a healthy lunch. Incorporating energy balls into your child’s lunchbox can make lunchtime enjoyable and wholesome, offering a nutritious and appealing option that is easy to prepare.
Ingredients
- Dry Ingredients:
- 1 cup rolled oats
- ½ cup ground nuts (such as almonds or cashews)
- 2 tablespoons chia seeds or ground flaxseed
- ¼ cup dried fruits (like raisins, cranberries, or chopped dates)
- Binders and Flavourings:
- ½ cup nut butter (peanut butter, almond butter, or sunflower seed butter for allergy considerations)
- 2–3 teaspoons honey or maple syrup (adjust based on sweetness preference)
- ½ teaspoon vanilla extract
- Optional:
- A pinch of cinnamon or cocoa powder for extra flavor
Preparation Steps
- Combine Dry Ingredients: In a large mixing bowl, stir the rolled oats, ground nuts, chia or flaxseed, and dried fruits.
- Mix the Wet Ingredients: In another bowl, blend the nut butter, honey or maple syrup, and vanilla extract. If you’re using optional flavorings like cinnamon or cocoa, add them now.
- Bring It Together: Pour the wet mixture over the dry ingredients. Mix thoroughly until all the ingredients are evenly combined. The mixture should be sticky enough to hold together when pressed.
- Shape the Balls: Using your hands, scoop a small portion of the mixture (about one tablespoon) and roll it between your palms to form a ball. If the mixture feels too dry, add a tiny splash of nut butter.
- Chill and Store: Place the energy balls on a baking sheet lined with parchment paper and chill them in the refrigerator for at least 30 minutes to firm up. Once set, store them in an airtight container in the fridge for up to a week.
These energy balls are perfect as a protein-rich snack that is quick to grab and go. Their small size makes them ideal for lunch boxes, and the variety of ingredients means you can adjust the recipe based on your child’s taste.
Edible “Faces” for Extra Fun
Turning mealtime into a creative art project can make lunch something kids look forward to. This recipe involves building fun, edible faces that are as nutritious as they are playful. Use a few slices of pre-cut vegetables or fruits to create the faces, adding a touch of customization and flavor to the meal.
Ingredients
- Base:
- Mini whole grain crackers, rice cakes, or small slices of whole grain bread
- Spreads:
- ¼ to ½ cup chickpea spread or hummus
- Vegetable Decorations:
- Cucumber slices (for eyes)
- Cherry tomato halves (for a nose or cheeks)
- Shredded carrots (for a smile or hair)
- Olive slices (optional for extra features such as eyes or eyebrows)
- Extras:
- A light drizzle of a kid-friendly dressing or a sprinkle of herbs adds color
Preparation Steps
- Prepare the Base: Arrange your mini crackers or rice cakes on a clean plate. These will serve as the canvas for your edible faces.
- Spread the Base Layer: Using a small spoon or spatula spread a thin layer of chickpea spread or hummus evenly on each cracker or rice cake. This adds protein and provides a sticky base for the decorations.
- Create the Features:
- Place thin cucumber slices as eyes on the top half of each base.
- Use a cherry tomato half to form a nose in the center.
- Arrange shredded carrots in a curved line below the tomato to represent a smile.
- Optional: Add a small olive slice above the eyes for eyebrows or on the sides as extra decorative elements.
- Personalize the Design: Allow your child to help decorate their edible face. They can choose the arrangement of features, making it a fun, interactive activity. This extra involvement often encourages them to eat their lunch.
- Serve Immediately: These fun faces are best enjoyed fresh, so try to serve them soon after assembly to keep the crackers or rice cakes crisp.
This creative presentation turns a simple lunch into an interactive snack-time activity. Kids often appreciate the opportunity to be part of the design process, which can help them eat more of the nutritious ingredients on their plates.
Planning and Preparation
How to Plan a Week’s Worth of Bento Boxes
Planning a week’s worth of bento boxes can be a fun and creative process that ensures your child enjoys a variety of nutritious meals. Here’s how to get started:
- List Favorites: Begin by listing your child’s favorite foods and ingredients. This helps in creating meals they will look forward to.
- Consider Restrictions: Consider any dietary restrictions or allergies to ensure all meals are safe and suitable.
- Balance and Variety: Plan meals that balance protein, vegetables, fruits, and whole grains. Variety keeps meals interesting and nutritionally balanced.
- Grocery Shopping: Make a comprehensive grocery list and shop for all the ingredients in advance. This saves time and ensures you have everything you need.
- Prep in Advance: Cut vegetables, cook proteins, and prepare other ingredients beforehand. This makes assembling the bento boxes quicker and easier.
- Assemble: Use a variety of containers and compartments to keep food separate and fresh. Assemble the bento boxes the night before or the morning of, ensuring everything stays crisp and delicious.
By following these steps, you can efficiently plan and prepare a week’s worth of bento boxes that are both nutritious and appealing.
Tools and Equipment Needed for Bento Box Preparation
The right tools and equipment are essential to create delightful and nutritious bento boxes. Here are some basics to get you started:
- Bento Box Containers: These specialized containers can be found at most Asian markets or online. They come with compartments to keep different foods separate.
- Small Containers and Compartments: These are useful for holding dips, dressings, or small portions of food, ensuring everything stays fresh and doesn’t mix.
- Utensils: A small set of utensils, such as a fork, knife, and spoon, can be handy for eating from the bento box.
- Cutting Board and Knife: Essential for prepping ingredients like vegetables and proteins.
- Cooking Equipment: Depending on your chosen ingredients, you might need to cook proteins or vegetables in advance. A non-stick pan, oven, or steamer can be helpful.
- Ice Pack: An ice pack keeps perishable items like yogurt or sandwiches cool and fresh until lunchtime.
By equipping yourself with these tools, you can streamline the process of packing healthy and delicious bento boxes for your child’s school lunches.
School Lunch Inspiration
Struggling to come up with new ideas for school lunches? We’ve got you covered! Here are some creative and easy-to-make school lunch ideas that will keep your kids excited about their meals. From classic sandwiches to international cuisine, these ideas are perfect for busy parents and teachers looking to provide healthy and delicious options. Whether you’re packing a cheese sandwich, chicken nuggets, or a fun cold lunch idea, these school lunch inspirations will help you create nutritious and enjoyable meals for kids. Consider including hot lunches like mini pizzas or pancakes to add variety to your child’s meals.

Healthy Store-Bought Snacks for Bento Boxes
While homemade snacks are excellent, sometimes you need the convenience of store-bought options. Here are some healthy store-bought snacks that are perfect for bento boxes:
- Veggie Sticks with Hummus: Pre-cut veggie sticks paired with a small container of hummus make for a crunchy and satisfying snack.
- Fresh Fruit Cups: Individual fruit cups are a great way to add a sweet and refreshing element to the lunch box.
- Yogurt Cups: Opt for low-sugar yogurt cups to provide a creamy and protein-rich snack.
- Granola Bars: Choose granola bars that are low in added sugars and high in fiber for a quick energy boost.
- Trail Mix: A mix of nuts, seeds, and dried fruits can offer a tasty and nutritious snack.
When selecting store-bought snacks, always read the labels to ensure they are low in added sugars, salt, and unhealthy fats. These snacks can complement your homemade bento box items, making lunch preparation even easier.
Tips for Packing a Bento Box
Packing a bento box can be a fun and creative process, but it can also feel overwhelming if you’re not sure where to start. Here are some tips to help you pack a bento box that is both healthy and appealing:
- Balance is Key: Start with a mix of carbs, protein, and vegetables to ensure a well-rounded meal.
- Colorful Foods: Choose various colorful foods to make the bento box visually appealing and enticing for kids.
- Use Compartments: Small containers or compartments help keep foods separate and organized, preventing them from mixing and getting soggy.
- Stay Hydrated: Include a drink, such as water or milk, to keep your child hydrated throughout the day.
- Keep it Cool: Consider using a bento box with a built-in ice pack to keep food fresh until lunchtime.
These tips will help you pack nutritious and appealing lunches for your child.
By following these tips, you can create a bento box that is not only nutritious but also fun and exciting for your child to open.
Key Takeaways for Lunch Box Ideas
- Variety and Flexibility: Each recipe is designed to be adaptable. Swap ingredients or adjust seasonings based on what your child enjoys and what’s in season. These recipes also offer great ideas for kids, providing creative and healthy lunch options that are both appealing and nutritious.
- Step-by-Step Guidance: Detailed instructions ensure that even parents new to meal prep can easily assemble these creative lunches.
- Involvement Makes a Difference: Letting children help with the assembly—whether by shaping tofu with cookie cutters or decorating edible faces—can lead to greater enthusiasm for healthy foods.
- Prep and Storage Tips: Good preparation on weekends makes assembling these lunches quicker during busy school mornings. Clear, well-labeled containers keep ingredients fresh and ready to mix.
Final Thoughts on Healthy Lunch
These expanded recipes turn the task of preparing high-protein veggie lunches into a creative and engaging process. With clear ingredient lists and step-by-step instructions, you can prepare nutritious and fun meals. The options—from colorful bento boxes and layered mason jar salads to interactive wraps, energy balls, and playful edible faces—offer a variety of textures and flavors that cater to your child’s taste and nutritional needs, making them perfect for packed lunches.
The detailed steps in each recipe mean that you can assemble a balanced, protein-rich lunch even on hectic mornings without any guesswork. Involving your kids in the process encourages healthy eating habits and makes mealtime a shared, enjoyable experience. Experiment with different ingredients, adjust the seasonings to your child’s liking and don’t be afraid to try new combinations. Packing lunches in advance can save time and ensure your child has a balanced and nutritious meal daily.
These recipes are a practical guide for busy parents looking for easy ways to combine nutrition and creativity in school lunches. Use them as a starting point and build on the ideas to create your own personalized menu. Enjoy the process, and watch as your kids become more excited about what’s in their lunchbox!
Frequently Asked Questions
How Can I Prevent Protein-Rich Veggie Lunches From Becoming Soggy?
You’ll keep your protein-rich veggies crisp by using moisture control techniques: pack wet ingredients separately, add paper towels between layers, and choose soggy alternatives like roasted vegetables instead of raw ones.
What if My Child Has an Allergy to Soy or Nuts?
You’ll find plenty of allergy alternatives like seeds, beans, and lentils that are safe substitutes for soy and nuts. Try chickpeas, sunflower seeds, pumpkin seeds, and quinoa for protein-rich, allergy-friendly options.
Which Veggie Protein Options Work Best for Picky Eaters?
You’ll find success with chickpea pasta, as it tastes similar to regular pasta. Try lentil tacos with familiar toppings like cheese and lettuce. Start with these options since they resemble foods they already enjoy.
Are There Any Veggie Protein Lunches That Don’t Require Refrigeration?
You can pack shelf-stable veggie wraps with nut butter, sunflower seeds, and dried chickpeas. While protein smoothies need refrigeration, you’ll find success with protein bars, roasted edamame, and trail mix combinations.
How Long Can Protein-Packed Veggie Lunches Safely Stay in a Lunchbox?
For food safety, you’ll want to keep your lunchbox contents at safe temperatures for 2-4 hours. If you’re using an insulated lunchbox with ice packs, you can extend storage time up to 6 hours.
To Sum it Up
You’re now equipped to create protein-packed veggie lunches your kids will actually want to eat. By mixing colorful ingredients, getting creative with presentations, and involving your little ones in the process, you’ll transform lunchtime from a challenge into an adventure. Remember: small changes lead to big results. With these tips and tricks in your parenting toolkit, you can make plant-based lunches that fuel growing bodies and spark happy smiles.
